| Published: | |
| Updated: |
How to Convert DVD Video to MP3 or Audio CD Format
[2007-03-02] Note: This guide is very old. While the information in it is still valid, you might find a much easier procedure, or even simple one-step software to do the job at Digital Digest or VideoHelp.com. (I haven't looked at the material close enough myself to make specific endorsements.)
Also, please don't email me if you can't get HeadAC3he working. I got it working okay using the procedure outlined in this document. It's tricky to install; if RAR files and programs without installers make you uncomfortable, seek the assistance of a friendly computer geek you know. I'm sorry, but I'm very bad at answering tech support email about my publications because life keeps getting in the way.
[TOC]
With the growing acceptance of DVD in the marketplace, it has become common for music, both concerts and studio recordings, to be mastered and distributed in this format. For years computer geeks have been streamlining the process of ripping and backing up Audio CDs to the point where the user doesn't have to do much thinking at all. DVDs aren't as easy to rip.
While I enjoy having the full digital surround sound a music DVD offers, and I purchase music in this format because of the digital surround sound, I also like to keep a copy of all my music on my personal server in MP3 format so that I can call up any album or track immediately with my standalone MP3 player. I'm sure a lot of you out there would like to load the music from their concert DVDs into their handheld MP3 players and CD players, too.
This guide shows you how to rip the audio from a DVD Video disc and create surround sound MP3 files or Audio CDs. The procedures described here depend on the presence of an AC3 (Dolby Digital) sound track, but fortunately, most DVDs have an AC3 track. This guide is specific to the DVD Video format; I have no experience with DVD Audio or Super Audio CD, so I can't tell you how to go about ripping one.
The MP3 and CD Audio formats are limited to two channels of audio, left and right. I have learned, however, that MP3 does adequately store and play back audio that has been mixed with the Dolby Pro Logic method, affording some semblance of surround sound on the proper playback equipment. (See Section 8.) Of course CD Audio one of the best way to encode two channels, so the Dolby Pro Logic encoding certainly won't be hurt by putting it on an Audio CD.
Note: It is possible to store and play multichannel surround sound (more than two channels of audio) on a computer. You could rip the AC3 stream (See Section 3.) perform no further processing, and use a program like CyberLink PowerDVD to play it. However, this takes up a lot of space and it's not very portable --- you can't load it onto your handheld MP3 player or CD player.
This guide assumes that you are using a Windows computer, are comfortable using it, know how to install programs, know how to extract files from RAR archives, and can manage files.
You will need a Windows computer with a DVD drive. If you want to burn Audio CDs, you will of course need a CD writer. If you're really lucky, you've got both capabilities in a single optical drive. You will need between 1 and 2 gigabytes of free disk space. You will need the following software:
Smart Ripper (dead as of Dec 2007)
Smart Ripper at videohelp.com
This DVD ripping program will conveniently rip a single video program to your computer, ignoring the menus, advertisements, movie trailers, and everything else you're not concerned with. And it can be told to extract only the AC3 audio stream, so you save even more space. You can use probably another DVD ripper to do that, but I prefer Smart Ripper because it writes an INFO file that tells you where the chapter stops (the starting points for each song) are supposed to go.
HeadAC3he (dead as of Dec 2007)
HeadAC3he at digital-digest.com (2008-04-24: also dead... The page lists links to three components you need to download and the third one is MIA. I'll update here by next week if I can find a copy of the files somewhere.)
This program decodes an AC3 audio stream and downmixes it a two-channel WAV file with Dolby Pro Logic surround sound. You will only need these components, which available at the above URL: HeadAC3he, Libmmd DLL, Azid DLL, SSRC DLL (download the version appropriate for your CPU.) I simply extracted all those components to the same folder, but you might prefer to put the DLLs in your System folder.
[Dec 2007] Since the original site seems to be down, try downloading all three RAR files from the digital-digest.com URL above and extracting them all to the same folder. Hopefully you'll have everything you need then.
This is optional, but if you want to get the breaks between tracks/songs exactly where they are in the original DVD, you will need to use this Microsoft Excel spreadsheet I made to do some calculations on the numbers Smart Ripper gives you. If you don't have access to Microsoft Excel, OpenOffice.org is good free alternative, but the download is quite large.
[8 January 2003] A reader was kind enough to do some work to enhance this spreadsheet. 
This is the best program I could find for splitting a large WAV file into individual tracks/songs. It is the only non-freeware program you probably don't already have that is used in this guide. It is fully functional when unregistered, but please pay the author's $15 registration fee if you like it and continue to use it.
RazorLame GUI
LAME engine (dead as of 23 April 2008)
LAME engine
If you want to make MP3 files, you will need an MP3 encoder. I will show you how to do it using RazorLame. If you'd prefer to use your own encoder instead, go ahead.
Download and install RazorLame from the first URL above. Then go to the second URL and get a Zip file of containing the Windows executable for the LAME engine and extract lame.exe from this file into the folder where you installed RazorLame. Start RazorLame and go to the Options command in the Edit menu and set the path to lame.exe.
This is optional, and of course you can substitute your own favorite MP3 tag editor. MP3 Tag Studio creates ID3 and ID3v2 tags in your output MP3 files so that your MP3 player knows the title, album, artist, etc., of each track.
If you want to make Audio CDs, this free program will take the single WAV file generated by HeadAC3he plus the CUE sheet generated by CD Wave Editor and burn a CD with no gaps between the tracks, so it sounds just like the original DVD. Other programs may be able to do the same thing.
Put the disc you want to rip into your DVD drive and start Smart Ripper.
Select Movie as your ripping method and go to the Input tab. Under the list of Program Chains, select the one you want to rip; it will probably be the one with the longest running time. At this point, if you want to skip any of the tracks/songs, deselect the appropriate Chapters in the list.
Go to the Stream Processing tab. Check the Enable Stream Processing checkbox and deselect all the streams except for the AC3 audio stream. Set that stream to Demux to extra file instead of Direct stream copy. Note: If you don't see an AC3 stream listed there, you're out of luck. As I stated above, the instructions in this guide are for AC3 audio.
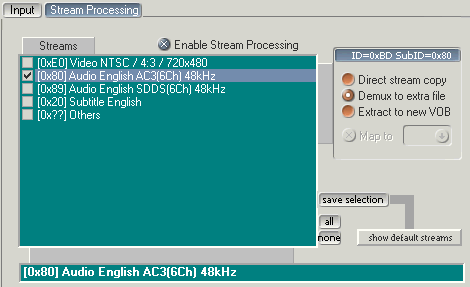
You might notice that the Settings dialog box has a selection to split the output at every chapter stop. This won't work for two reasons --- no matter what, you will only get one AC3 file per program using Stream Ripper, plus later we will want to normalize the entire program as a unit so that all the chapters are the correct volume level with respect to each other.
Click the button with the folder icon under Target and select an output folder. Now click the Start button and sit back and wait. This should take somewhere between ten and forty-five minutes, depending on the speed of your DVD drive.
In the end you should get a bunch of files in your output folder. Two of them are important: One is named something like
vts_01_([0x80]_Audio_English_AC3(6Ch)_48kHz___)_Delay_0ms.ac3
and it contains the AC3 stream, and the other is named something like vts_01_INFO.txt and it contains the time indices of the chapter stops. I will call these the AC3 stream file and the INFO file, respectively.
Start HeadAC3he. Hint: I discovered that if you use a Windows skinning program like WindowBlinds, you might have to resize HeadAC3he's window to make its Start Button appear.
Click the Source File button and select the AC3 stream file you created in the last step. It automatically assumes that you want to write the output to a WAV file of the same name, in the same folder. You may leave this as it is. The default output format is WAV; 16 bit int. Leave this too. Be sure 2-Pass Mode is checked and select the float method. Set it to normalize to 100%.
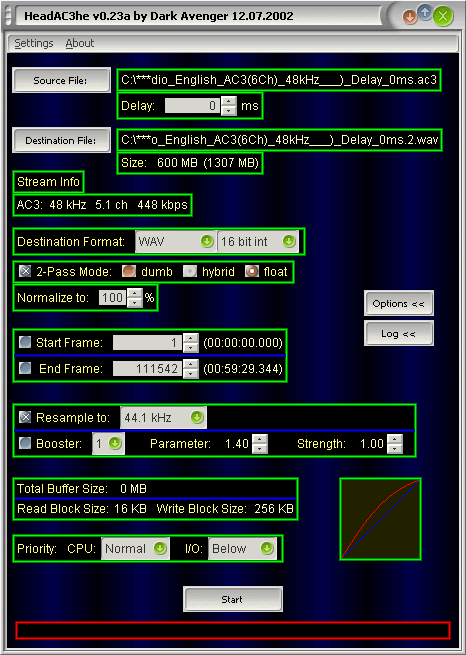
Set it to Resample to 44.1kHz. This is required if you are planning to make an Audio CD. If you're making MP3 files, I recommend it, but you can certainly make 48kHz MP3 files if you prefer it. (Be aware that some hardware MP3 players and even some software MP3 players do not support 48kHz sampling.)
Click the Options button and the Channel Configuration window appears. In that window, click the button labeled 2ch. This will set everything in the window to properly output a two-channel WAV file with Dolby Pro Logic surround sound. Note: you will get Dolby Pro Logic output only if the source from the DVD is more than two channels or if the source is two channels with Dolby Pro Logic. If the AC3 stream on your DVD was just plain monaural or stereo, you will get just that in your WAV file.
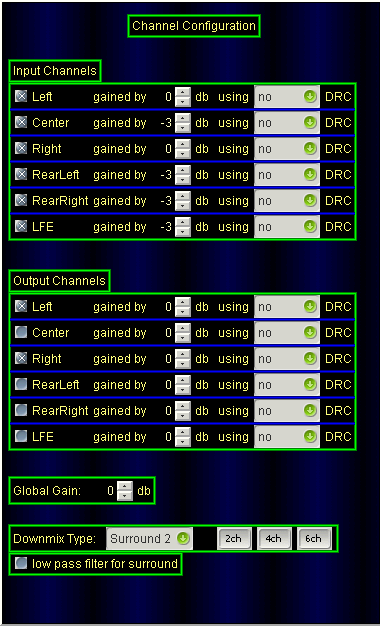
After set up 2ch mode, I recommend that you set Left and Right under Output Channels to no DRC instead of normal. DRC means dynamic compression; it makes the quiet parts of the music louder. I think dynamic compression is bad, and it should only be used if you will always be listening to the output files in a noisy environment, such as jogging on the street with a CD player. This is just another matter of personal taste, though.
Click the Start button and sit back and let HeadAC3he do its thing. I have a Pentium 733 with an ATA-100 hard drive, and it took me about 20 minutes to process Blue Man Group's Audio album, which is just about an hour long.
Now you should have a two-channel WAV file.
There are two ways you can set up the markers in CD Wave Editor for the beginnings of tracks. You can set the markers exactly where they were on the DVD or you can simply set them where you feel they belong. If you choose the latter method, skip ahead a few paragraphs.
If you're like me, you want to set the markers exactly where the technician mastering the DVD put his chapter stops. This is possible. Make a copy of my Chapter Stop Calculator (the Excel spreadsheet I mentioned in Section 2) and open it. Use any text editor to open the INFO file that Stream Ripper made.
In the spreadsheet, set cell A4 to the video frame rate your DVD disc uses. There are many ways to determine this number, but a good rule of thumb is that it will be 29.97 (or maybe 30) if the disc was made for the U.S. market and it will probably be 25 otherwise. Other numbers to try are 23.976 or 24 for film sources. If you're not sure, get a program that lets you peek inside a DVD's structure. Now enter the chapter stops: Look in the INFO file for a line containing "Chap#=Frame#". The lines after that are the video frame numbers where each chapter starts, so copy them to the B column in the spreadsheet. For reference, you might want to fill in the F column with the chapter titles from the DVD's case or from its menus. Now the D and E columns will display the time indices in the format CD Wave Editor expects: hour:minute:second:frame, where there are 75 audio frames in a second. (This time format is a result of the way Audio CDs are formatted.)

You might notice another series of chapter stops in the INFO file that are already written in hour:minute:second.decimal notation. These numbers may be wrong because of the way Smart Ripper derived them, so ignore them.
Now you either have exact chapter stop positions or you are planning to eyeball it. Start CD Wave Editor and open the WAV file that came from HeadAC3he. CD Wave Editor is divided into three sections: a graphical overview of the entire sound file, a zoomed-in view of the immediate vicinity of the currently selected time point, and a list of the cuts that are to be made on the sound file.
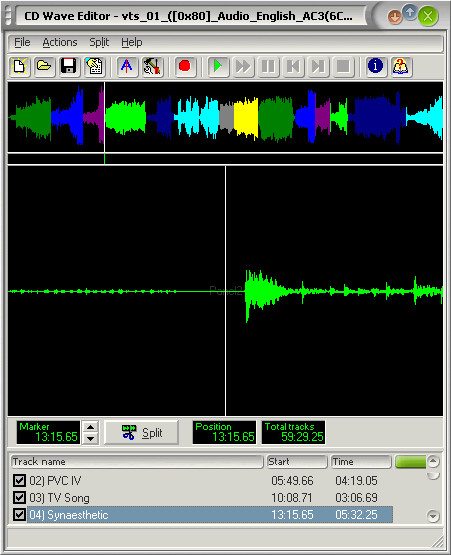
Your first chapter stop will probably be at 0 seconds, so it's already in there. Read the time index of the second chapter stop from the calculation spreadsheet; if you skipped that step you can simply guess where it would be. Click and hold in the overview graph and move the cursor around until you are near the correct point; the Position box will tell you where the cursor is pointing. Still observing the Position box, click and hold in the zoomed-in graph and move around until you are pointing exactly at the time index for the chapter stop. Don't forget to use the Play button to hear where you are. When you've got the cursor at the correct point for the chapter stop, click the Split button. Input the rest of the chapter stops in the same manner.
For reference, enter the track titles: Select each region in the list of cuts on the bottom of the window, one at a time, hit F2 to rename them, and fill in the real name of the track. If you are making MP3 files, their filenames will come from these titles, so I suggest you use the format track number) track title.
Click the Save Cue Sheet command in the File menu. This saves your track start times to a CUE file. The CUE file happens to be compatible with Exact Audio Copy. (See Section 7.)
If you are making an Audio CD, you are done with CD Wave Editor. If you want to make MP3 files, click the Save command in the File menu. Specify the output folder and click OK. This will split the big WAV file into a series of smaller WAV files, one for each track, which can be encoded individually with your MP3 encoder. It shouldn't take more than a few minutes.
Please note that you will have to modify this procedure slightly if you want to make Audio CDs from a sound recording longer than your blank CD-Rs. You will have to use CD Wave Editor on first WAV file to split it into chunks smaller than 74 or 80 minutes, depending on the size of your CD-Rs, and then edit each of those WAV files in turn and define track start times, saving the cuts to CUE files.
Open RazorLame. Click the Add button and add to RazorLame's job queue the WAV files containing individual tracks which you extracted with CD Wave Editor.
The following instructions set up RazorLame to encode high-resolution variable bitrate MP3 files suitable for archiving. The resulting files generally come out at about 180kbps, or about 1.4 million bytes per minute. The actual file size depends not only on the length of the recording but also on the complexity of the sound.
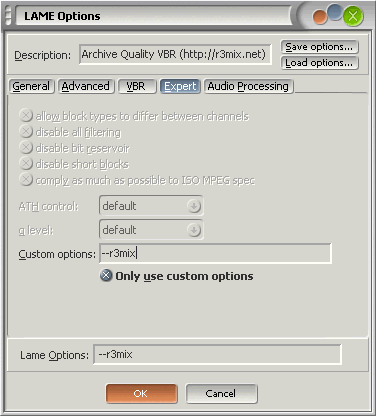
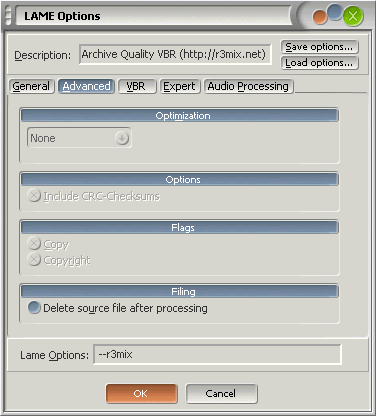
Click the LAME button and go to the Expert tab of the LAME Options dialog box. Enter "--r3mix" in the "Custom options" textbox. Check the Use only custom options checkbox. Go to the Advanced tab and be sure that Delete source file after processing checkbox is unchecked --- unless you really want to delete the input WAV files right away. For an explanation of the r3mix option, check out www.r3mix.net. (Note --- 22 October 2005 --- This link is dead. I think the r3mix option is dead, too. Try "--preset standard".)
If you want to make smaller, lower-quality MP3 files, don't use the r3mix option and instead choose a predefined profile with the Load options button in the LAME Options dialog box, or uncheck Use only custom options and set the options in the General, Advanced, and VBR tabs as you see fit.
Click the Encode button wait some more. Again, my computer takes about 20 minutes per hour of audio to perform this task.
Now you have a set of MP3 files, one for each track in the recording. If you don't care about tagging the MP3 files with title, album, and artist information, you're done. If you do want to tag them, here's how to do it with MP3/Tag Studio:
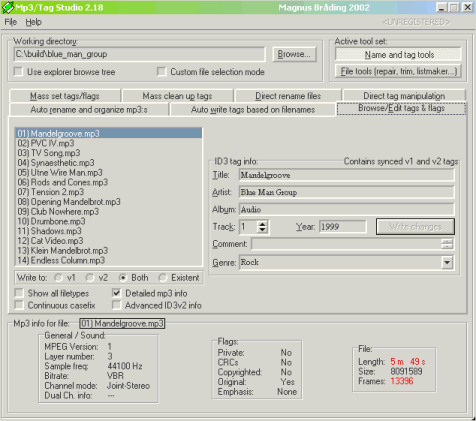
Open MP3/Tag Studio and select the folder where the MP3 files are. Go to the Browse/Edit tags & flags tab and be sure the Both option to the right of the text "Write to" is selected. (I'm having you do this here because I'm pretty sure it affects what kinds of tags are created by any other commands in the program.)
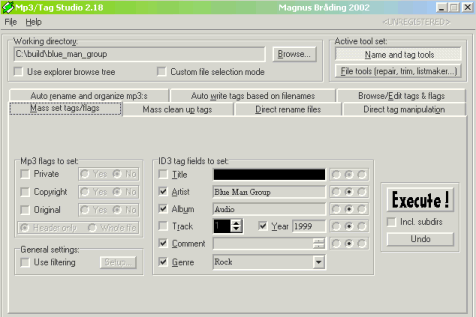
Now go to the Mass set tags/flags tab and check everything under ID3 tag fields to set except Title and Track. In the fields you checked, enter the appropriate information for Artist, Album, Year, Comment, and Genre; leave anything blank if you don't know what to set it to. Click Execute. It will try and fail to create tags in all the non-MP3 files in the folder, but don't worry about that.
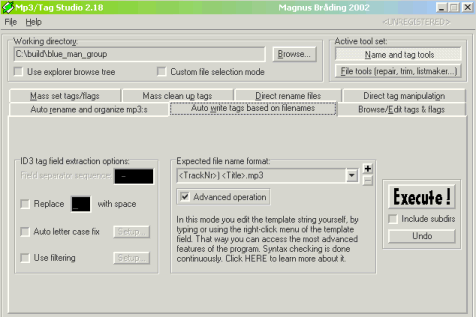
Now go to the Auto write tags based on filenames tab. If you named your tracks the way I suggested in Section 5 (i.e. track number) track title) check the "Advanced operation" checkbox and enter <TrackNr>) <Title>.mp3 under Expected filename format. Click the Execute button. If you used a different track naming scheme, you will have to supply a different format string, or simply go to the Browse/Edit tags & flags tab and enter the attributes for each track individually.
Obviously this tagging procedure isn't exactly correct if you are dealing with some sort of compilation album where each track is written or performed by a different artist, but you should be able to get the general picture of how to use MP3/Tag Studio from the preceding example.
Open Exact Audio Copy. Select the Write CD-R command from the Tools menu. In the CD Layout Editor, select Load CUE Sheet from the File menu. Choose the CUE file you created with CD Wave Editor. Choose the Write CD command from the CD-R menu to burn the album to CD. The time this will take depends on the speed of your CD writer.

As I mentioned earlier, using Exact Audio Copy to burn an Audio CD in this manner ensures that there are no silent gaps between the tracks. You can skip forward and backward to specific track numbers as with any other Audio CD, but, just like most "live" concert CDs, the entire disc plays as one uninterrupted recording. Any silence you do get was there in the original audio on the DVD as well.
The MP3 files or Audio CD(s) you made with one of the above procedures will work on anything that plays MP3s or Audio CDs. But unlike most plain stereo audio recordings, these files are mixed with Dolby Pro Logic surround sound (by HeadAC3he) if the original audio from the DVD was encoded in some form of surround sound.
On systems that play back through two stereo speakers or headphones, you may experience a pleasant effect that takes sounds belonging in the rear of the room and places them somewhat away from the space immediately between the speakers. You might perceive such sounds as being above you, behind you, or perhaps just somewhere off to the side.
If you have hardware and/or software that specifically supports Dolby Pro Logic playback, such as CyberLink PowerDVD and a five-piece computer speaker system, you should perceive a certain amount of depth to the music. The main sounds will appear accurately somewhere in front of you, while the sounds that were in the rear portion of the DVD audio will appear somewhere generally behind you. The actual positions of individual sounds will be nowhere near as accurate as the AC3 audio that was on the DVD, but it is better than a flat one-dimensional stereo image.
As far as I know, MP3 encoding does not adversely affect the Dolby Pro Logic mixing scheme. (If anyone has an authoritative opinion on the subject, please let me know.) I believe Pro Logic positions the audio with a clever phase shifting technique, and I know that MP3 encoding does not affect the phase relationship among any signals present in an audio stream.
This policy contains information about your privacy. By posting, you are declaring that you understand this policy:
This policy is subject to change at any time and without notice.
Reader-contributed comments on Glump.net are owned by their original authors, who reserve all rights.
Comments rules:
Comments